Monday 28 November 2016

Kegging for Christmas

Festive Pale Ale - brewed 18/11/2016

I haven't kegged any homebrew for over a year but I felt it was about time to fill a pressure barrel in time for Christmas. I feel it's almost imperative to have a supply of beer on tap, it always makes me think of medieval or Tudor times when households always had barrels of beer available, apparently as beer was safer to drink than the local water supply. I don't know if that's actually true but it would definitely taste better than water. I'm pretty sure my water supply is safe to drink but just to be on the safe side I kegged the pale ale I brewed on November 18th (recipe here). Before kegging I took a final gravity reading of 1.010 giving an ABV of about 3.9%, a perfect session strength! I fermented this beer for 10 days, dry hopped with 20g of citra for the final three days and I have to say I am very pleased with the initial results. 

It's definitely pale, and pretty clear too!

Thursday 24 November 2016

Kolsch - update

Kolsch type beer 

A quick update on my Mancunian Kolsch as originally described here
It's now a lot clearer and more carbonated. I am quite bemused by the change in flavour since I last tried it, the sweet fruity yeasty flavour has gone completely and it's now a lot drier than it was before. All in all, a vast improvement after 7½ weeks of "temperature controlled" bottle conditioning (3 weeks in a micro brewery cold store, 4½ weeks in my shed).

Sunday 20 November 2016

Quality control - Porter

Tasting Porter brewed 20/10/2016

Colour looks ok!

I always get a bit nervous whenever I taste a homebrewed beer for the first time. There's an established chain of actions to go through. If it's a pale beer hold it up to the light and see how clear it is, although obviously not applicable in this case I try to see if the yeast sediment has settled at the bottom of the bottle. Next, I open the bottle and hopefully get the satisfying "pssst" noise and the plume of vapour swirling out of the top of the bottle. Sometimes this is followed by a bit of frothing but not the dreaded geyser/fire hydrant effect. In this case everything was encouragingly spot on. So far so good, but next it's time to actually taste the beer and for this Porter I was pretty well pleased. It's not quite as hoppy as I thought it might be but it is very well balanced, quite bitter but with no overpowering burnt or roasted notes and fairly dry, not too sweet with a slightly hoppy aftertaste. Phew! Better have another now, just to confirm my initial findings.


Friday 18 November 2016

Brewday 18/11/2016 - Pale Ale

Pale Ale brewday 18/11/2016

Partner's at work, kids are at school, I'm at home. What should I do?
I could do some of those odd jobs that have been stacking up, a bit of decorating, a bit of DIY maybe, or I could do something far more constructive!


Recipe (BIAB):

Since I have enough ingredients to make a nice hoppy pale ale, that's what I'm going to do.
  • Mash for 1 hr at 67°C
  • Boil for 60 mins
  • Mash water volume 30lt
  • Maris Otter 4kg
  • Carapils 130g
  • Crystal malt 215g
  • Galena 30g (at start)
  • Mosiac 25g (15 mins)
  • Mosiac 55g (at end)
  • Citra 20g (dry hopped)
  • Irish Moss 1 tsp (15 mins)
  • Gervin English Ale Yeast 11g pack
Apparently Gervin English Ale Yeast is the same as Nottingham but only half the price. I've used it a few times and always had good results.

Hopefully I should get 21-22lt in the fermenter.


Results:

I ended up with 22.5lt in the fermenter. I was concerned that the OG was down to 1.040 (should have been 1.044) but hopefully I should still get around 4% abv. Efficiency was only 65%, I usually get about 75%.

Tuesday 15 November 2016

Kolsch (type beer)

Home brewed Kolsch (-ish, made in Manchester)

I brewed this a few weeks ago and forgot to add some Irish Moss, it's still a bit hazy (15/11/16) but tastes good. I conditioned it for three weeks in the cold store at a friendly local micro and since then it's been further conditioned in my shed. I first tried it after bringing it back from the brewery and wasn't too happy as it had a bit of an apple flavour which fortunately has now faded after 2½ weeks of shed conditioning. Hopefully a few more weeks will clear it completely, standard home brew rules apply: if at first it doesn't taste right, leave it for a few weeks. It probably won't taste any worse.


Recipe (BIAB):

  • Mash for 1 hr at 67°C
  • Boil for 60 mins
  • Mash water volume 24lt
  • Pilsner malt 3kg
  • Carapils 375g
  • Spalt 33g (at start)
  • Spalt 17g (10 mins)
  • Spalt 15g (at end)
  • Hallertauer MF 23g (at end)
  • WL029 Kolsch yeast
Fermenter volume: 17lt
OG: 1.044 (a bit lower than expected - should have been around 1.050)
FG: 1.010
ABV: 4.5%
Brew date: 20/09/2016
Bottled: 04/10/2016

Friday 11 November 2016

Research Work

Testing Testing ...

Just drank a bottle of Adnams Ghost Ship (4.5%), a "ghostly pale ale" which was actually very good. Good hop flavour with a nice bitter background and the added bonus of a bottle with an easily removable label.
I also had a bottle of Brew Dog Dead Pony Club which I thought a bit disappointing. At 3.8% it's not that weak but I found it lacking body and the taste was just bitter with no floral hop flavours or aroma, overall pretty insipid.

Tuesday 8 November 2016

Bottling Day 8th Nov 2016

Bottling beer made on 20th October 2016

My hoppy porter had been in the fementer for 19 days so I decided to bottle it. To be absolutely sure I should have taken hydrometer readings to check the final gravity was not changing but I have never bothered to do this, mainly because I don't like opening the fermenter once the beer is fermenting. Anyway the FG was 1.016 (a bit higher than calculated so maybe I should have left it longer!) which gives an ABV of 4.46%

Equipment

  1. Bottling bucket 
  2. Syphon
  3. Hydrometer and Test Jar
  4. "Little Bottler"
  5. Hand Capper
  6. Bottle Steriliser
  7. Bottle Tree
  8. Bottles and caps
Compared to brewing, bottling is a relatively quick job where organisation is the key since once you start you can't stop, although it still takes me a couple of hours including cleaning. Start by sterilising a bottling bucket with some no-rinse steriliser. My bottling bucket is basically a 25lt plastic bucket with a tap fitted at near the base. Put the syphon and test jar into the bucket and ensure everything is soaked in the sterilising solution. 

Next prepare the priming solution. Use one of many available homebrew apps to calculate the amount of sugar required and dissolve it in a little boiling water. This is then left to cool while I sterilise the bottles and caps. Pour some of the sterilising solution into the bottle steriliser, sterilise and leave to drain on the bottle tree. I also put the caps into steriliser and just take them out as required.

Bottle Steriliser

Bottle tree


Transfer the wort to the bottling bucket with the syphon and take a sample for the FG reading. As a final check don't forget to drink the sample from the test jar! Pour in the priming solution and get bottling.


Bottling bucket with Little Bottler attached to the tap
The Little Bottler is a great way to bottle home brew. To fill a bottle simply push the bottle up against the end of the bottling tube and the one way valve lets the beer flow into the bottle. When the beer reaches the top withdraw the bottle and the valve stops the beer flowing out. Place a cap on the bottle and move on to the next one. Once the bucket is empty cap all your bottles and leave to condition for at least two weeks, longer is better. The final task is to clean all the equipment. 
Some brewers reuse the trub (the yeasty sludge left in the bottom of the fermenter) by pitching a new brew directly on to it (something way beyond my levels of organisation) or save the yeast by washing the trub and storing it refrigerated in sanitised jars for later brews.   

Thursday 3 November 2016

Brewday 20/10/2016 - Hoppy Porter

My most recent effort brewed 20/10/2016

Not sure what to call this, a black IPA? Hoppy Porter?

Grain Bill:

4kg Maris Otter
200g Chocolate Malt
120g Roasted Barley
80g Carafa III

Hops:

35g Galena 13.2% - at start of boil
20g Citra 13.7% - 15 mins from end
40g Citra 13.7% - at end of boil
25g Amarillo 10.1% - at end of boil

Yeast: Fermentis Safale S04 - 1 pack

The Mash - 60 mins

  1. Add 29lt water to pan and heat to 70°C. Turn off heat.
  2. Put bag in pan and add grains slowly. Mix well to avoid clumping.
  3. Check temperature, should now be 68°C. Add heat if necessary but ensure you do not burn the grain bag! A false bottom in the pan helps to avoid burning.
  4. Replace lid and leave for 60 mins. Have a beer, walk the dog, etc.
  5. Carefully lift out bag allowing the hot wort to drain into the pan. I tend to put the grain bag into a fermenter with an upturned colander in the bottom and leave it to drain some more. You can then squeeze the bag to extract as much wort as possible. In this case I ended up with about 27.5lt of wort in the pan.
Temperature check after grains are added


The Boil - 60 mins

  1. Bring the pan of wort up to boiling and add the first hop addition, cover and leave to boil.
  2. After 45 mins add the next batch of hops. I also put my immersion chiller into the pan and bring back to the boil, this will sterilise the chiller. Boil for a further 15 mins and turn off heat.
  3. Add final quantities of hops and leave to cool for 10-15 mins.
  4. Connect immersion chiller to cold tap and chill the wort down to 20°C as quickly as possible
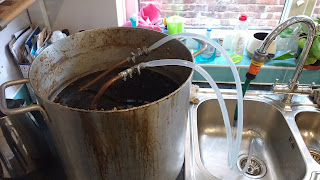
Chilling the wort


Fermentation

  1. While the wort is cooling I thoroughly sterilise the fermenter, seive, airlock and a plastic jug.
  2. Once wort is chilled down to 20°C it is ready to be transferred to the fermenter. Using the sterilised plastic jug pour the wort through the seive into the fermenter. I ended up with 21lt in the fermenter.
  3. Pour some wort into a test jar and take a hydrometer reading. In this case the OG was 1.050 which was exactly what was expected!
  4. Sprinkle the dried yeast onto the wort and seal the fermenter. Fill the airlock with previously boiled water and fit into the lid.
  5. Wait! The airlock should bubble away nicely for a few days, I usually leave the fermenter alone for at least 2 weeks before kegging or bottling.

Wednesday 2 November 2016

My Equipment

I have a fairly simple set up:


  • 40lt aluminium pan + lid
  • Brew bag - bought online
  • Plastic fermenters + airlocks
  • Thermometer
  • Hydrometer + plastic testing jar
  • Immersion chiller

Other items include:

  • Digital scales (capable of weighing to 1g)
  • Long handled spoon
  • Large seive
  • Kitchen hob!